We’ve Been Using Sendible for Social Media Management for 7+ Years. Here’s Why [In-Depth Sendible Review]
Back in 2015, when Idunn was just launched, I was looking for a social media management solution. I trialed three different ones and ended up choosing Sendible.
I haven’t looked back ever since.
As an agency, my team and I have worked with a lot of other similar platforms. Some of our social media marketing clients already had a subscription with a management tool and, understandably, they wanted to stick with it.
We took this as an opportunity to see what else is out there and, perhaps, make a switch ourselves if a better solution is developed.
Since 2015, we’ve tried more than a dozen of other solutions — some were big names in the industry, others have lasted less than two years. Still, we’ve stayed with Sendible and even convinced some of our clients to switch to it.
Why? I’ll explain below in detail.
But first, a primer.
What Is Sendible?
Sendible is an all-in-one social media management and marketing solution that helps schedule posts across several social networks, engage with your audience, measure your performance, monitor keywords, and discover content from other brands or influencers.
So, yes, a truly all-in-one solution. Sendible has come a long way since its early days when it was mostly a social media scheduler that also offered some basic reporting.
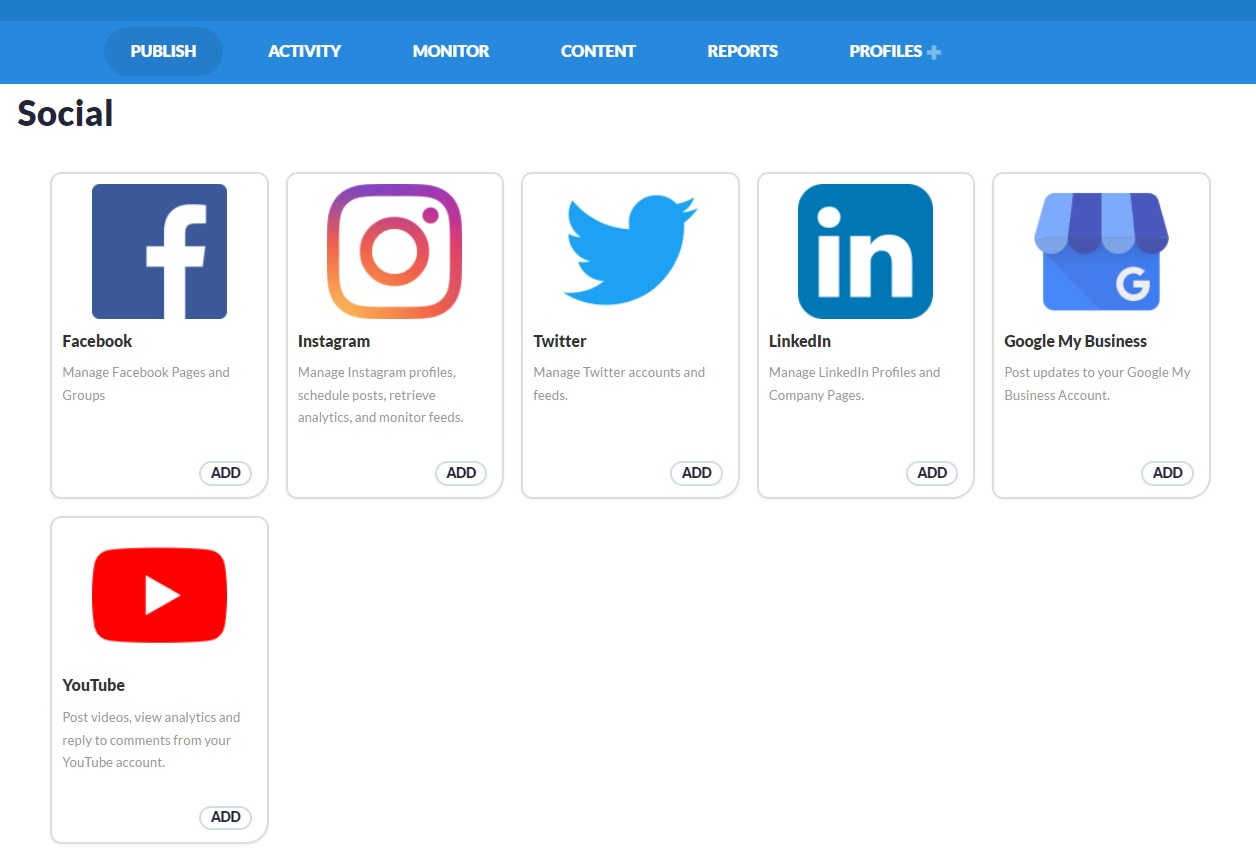
What social media networks does Sendible support? At the time of writing this, you’ll find pretty much any platform you need (the list is updated constantly):
- Google My Business (which will be retired in 2022, so it will be interesting to see if Sendible will offer integration with another Google platform).
- YouTube
Sendible supports more integrations than any of its competitors (a major plus if you ask me). You can also integrate it with:
- WordPress (draft and publish articles on WordPress.com or a self-hosted WordPress website)
- Canva
- Google Analytics
- Dropbox
- Google Drive
The list is far longer and, again, regularly updated. I suggest you try it out for yourself — you can test Sendible for free for 14 days, you don’t even need a credit card to get started!
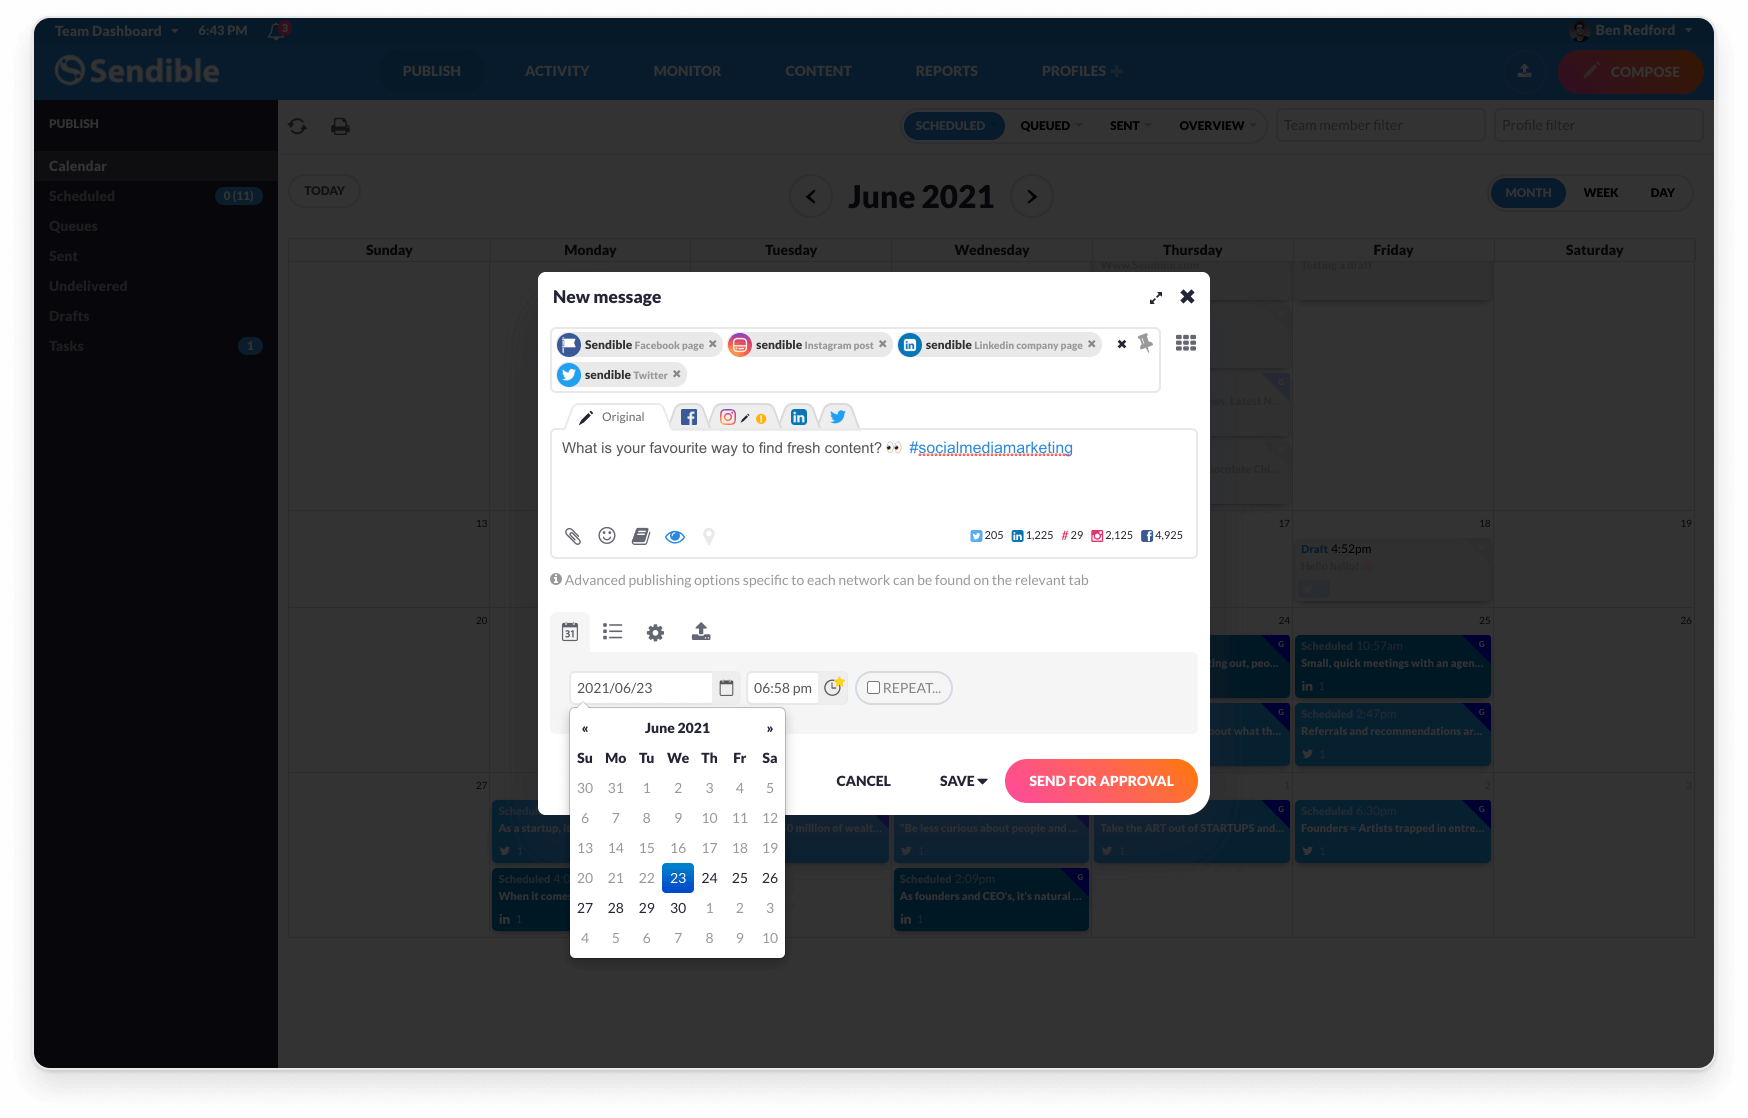
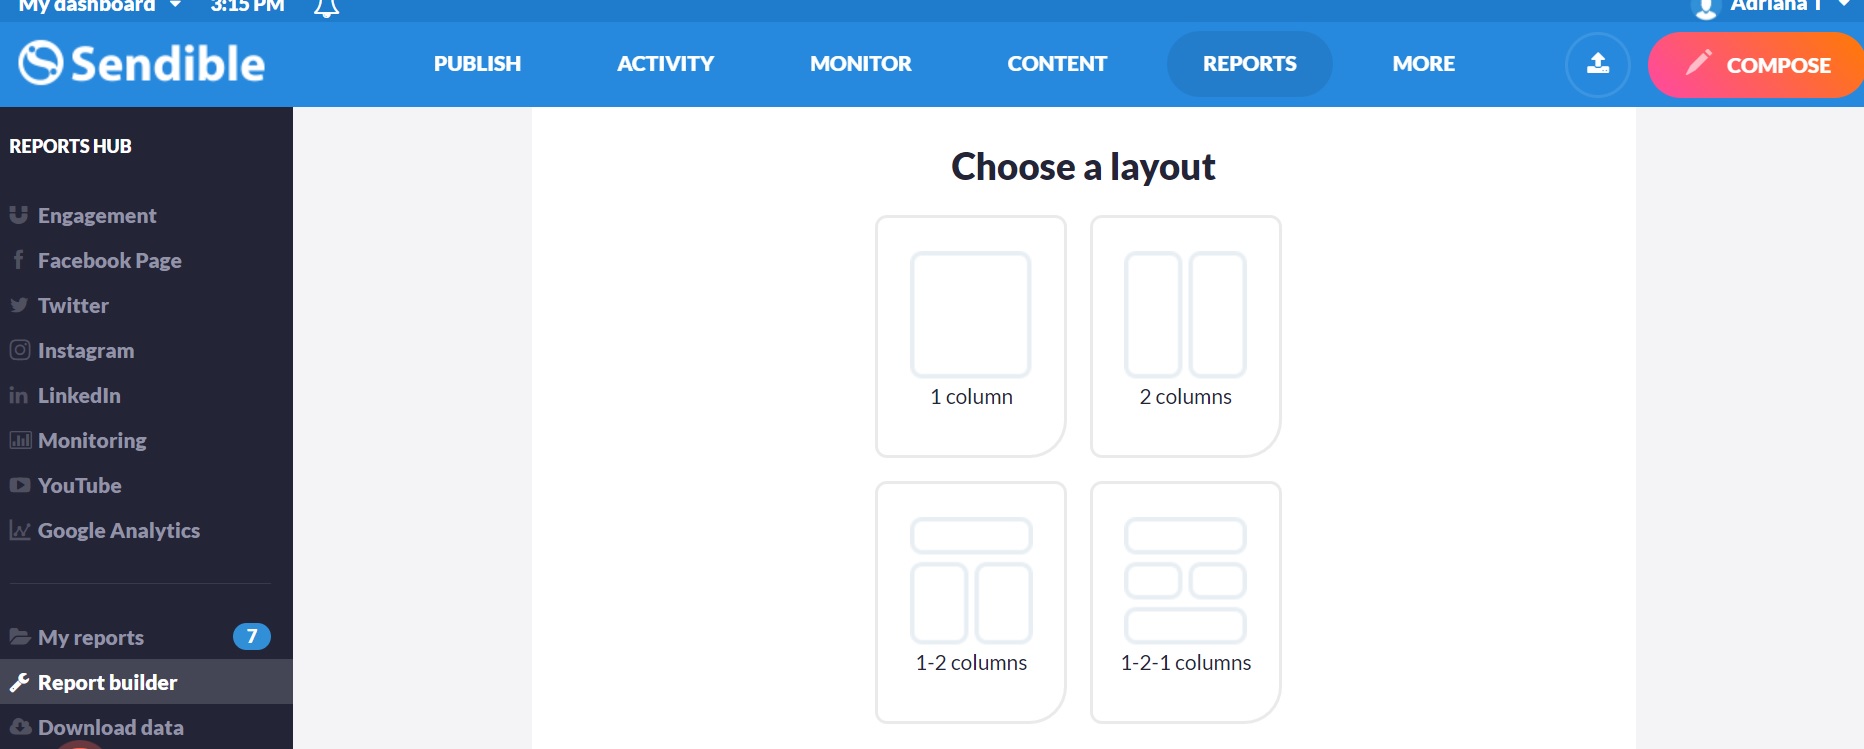
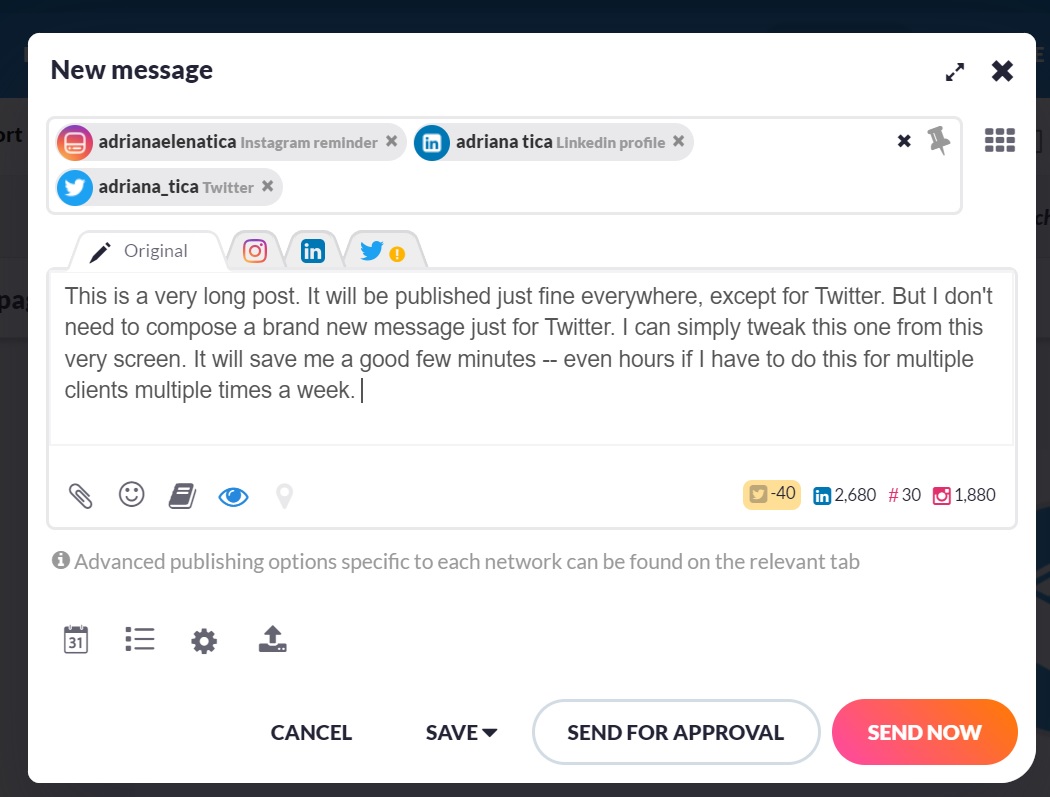
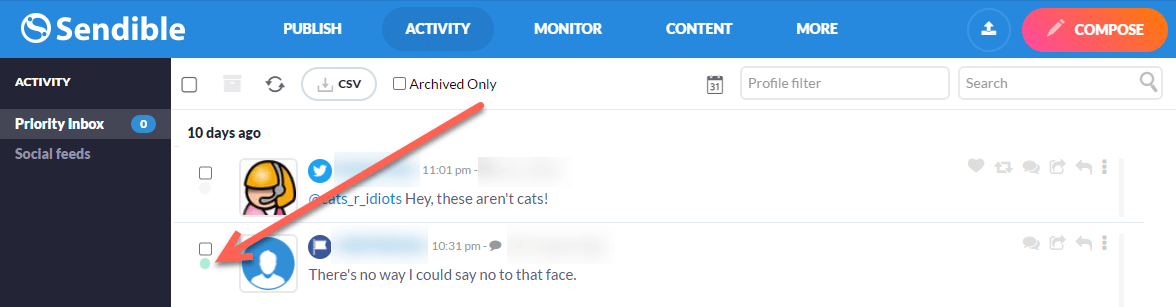
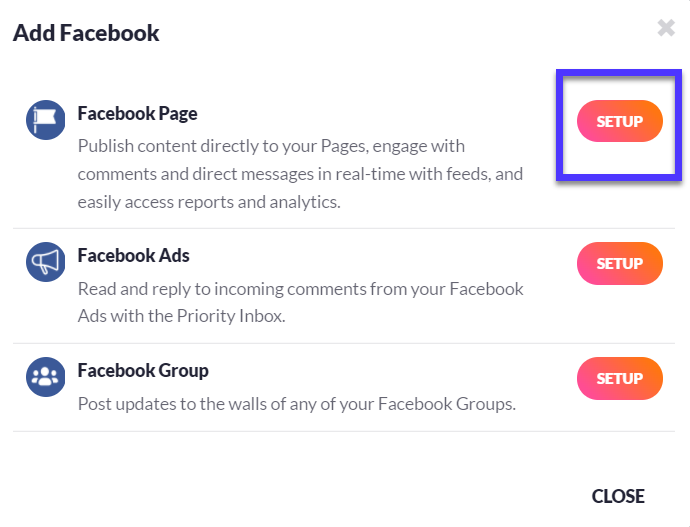
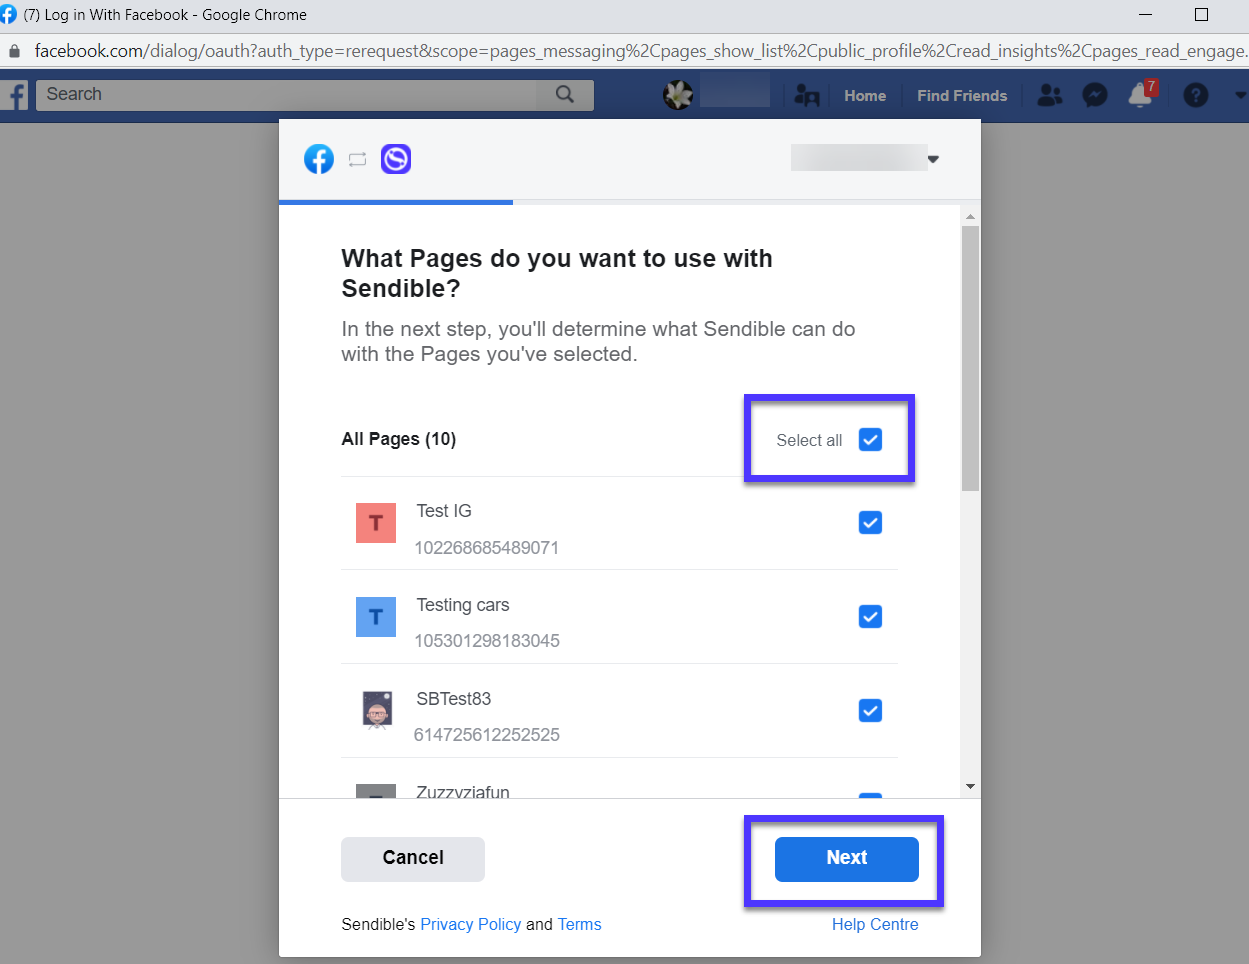
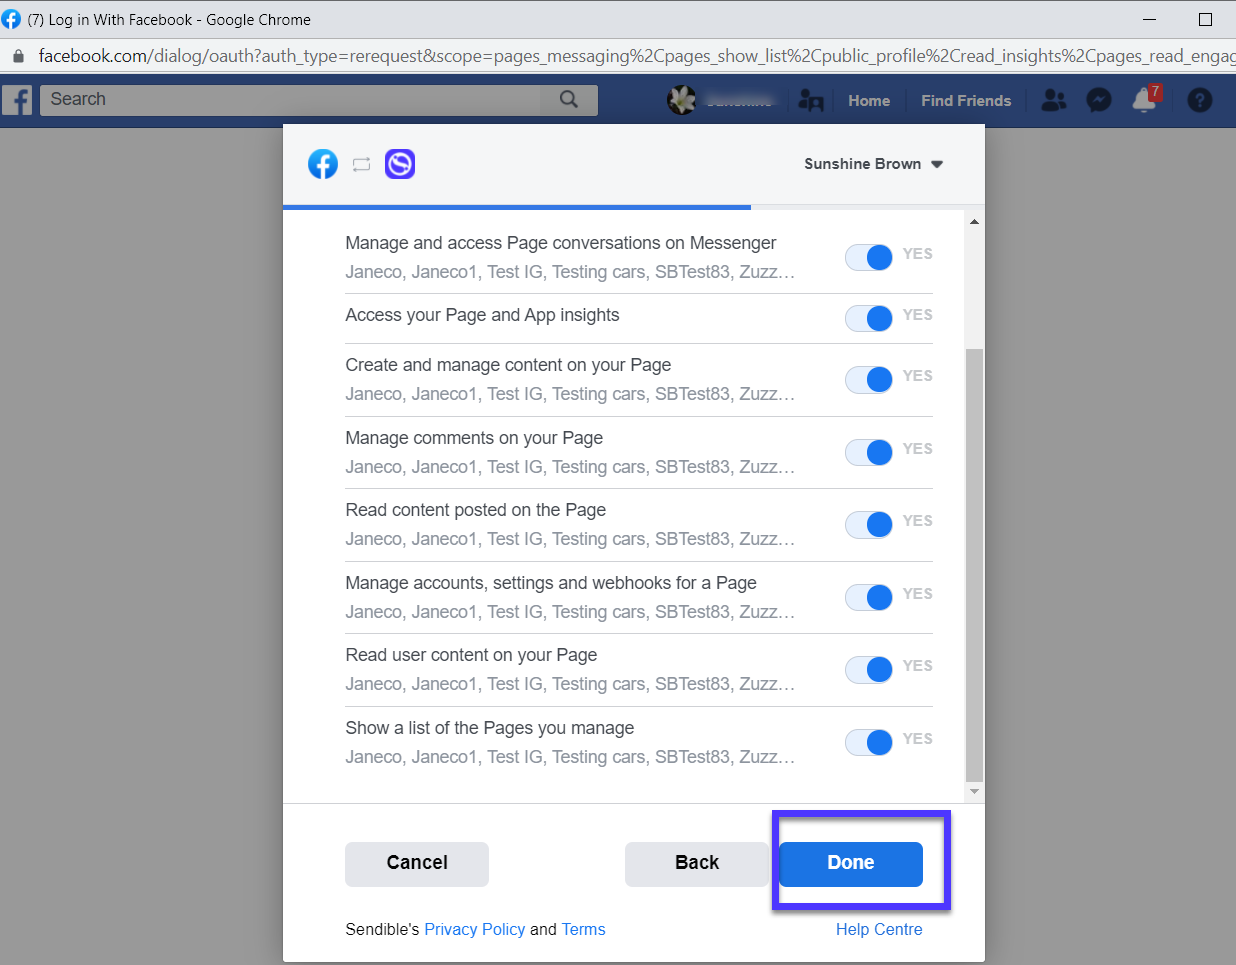
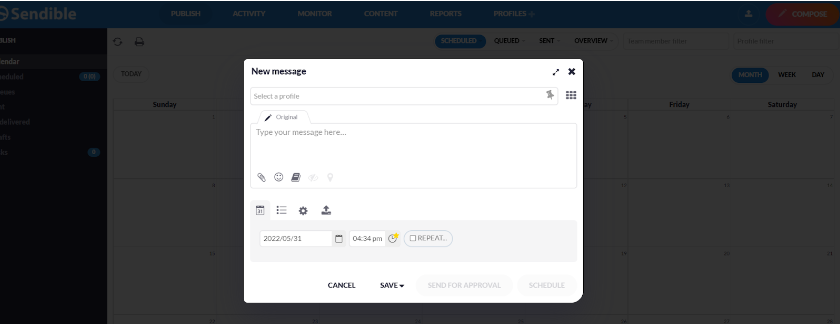
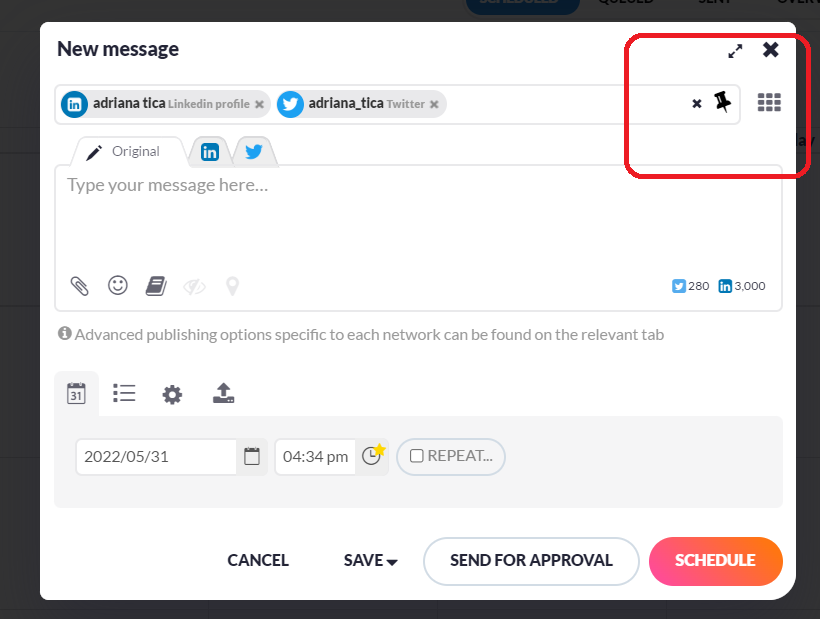
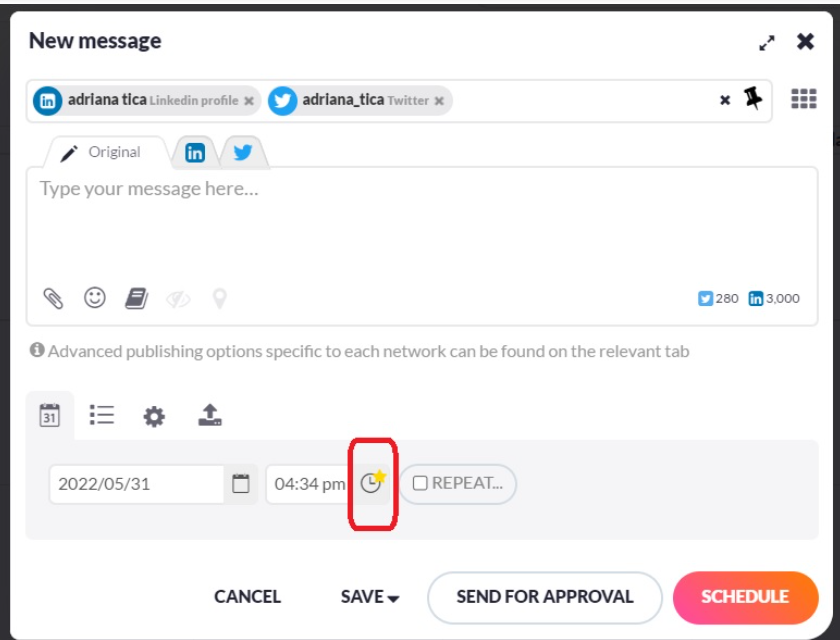
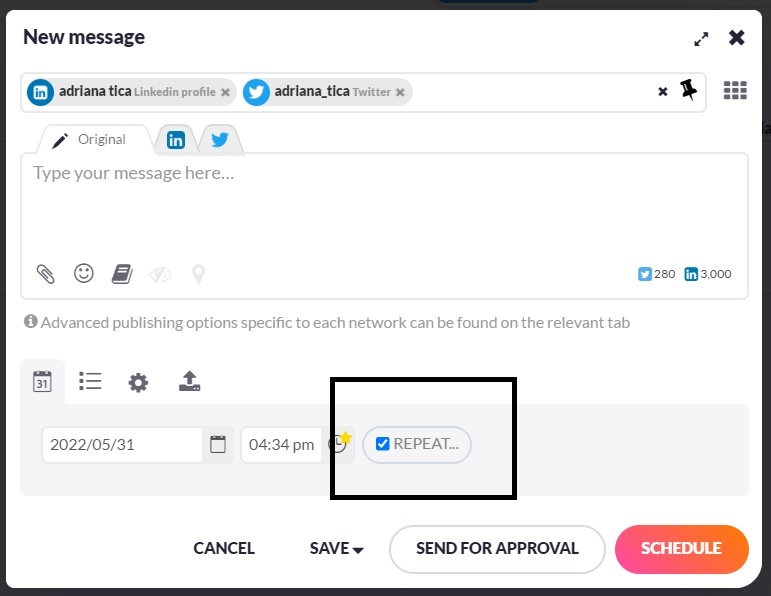
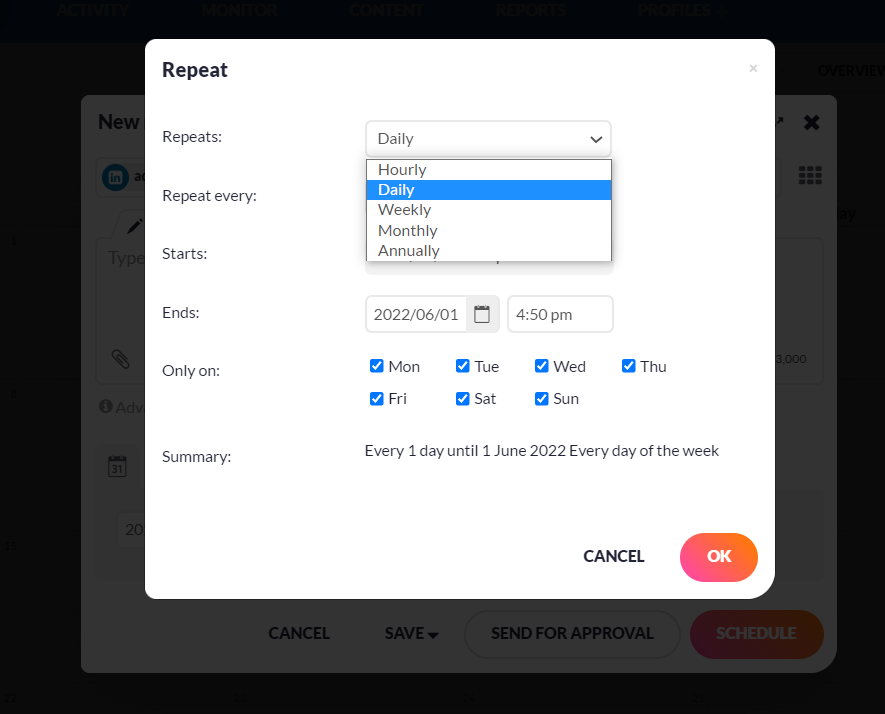
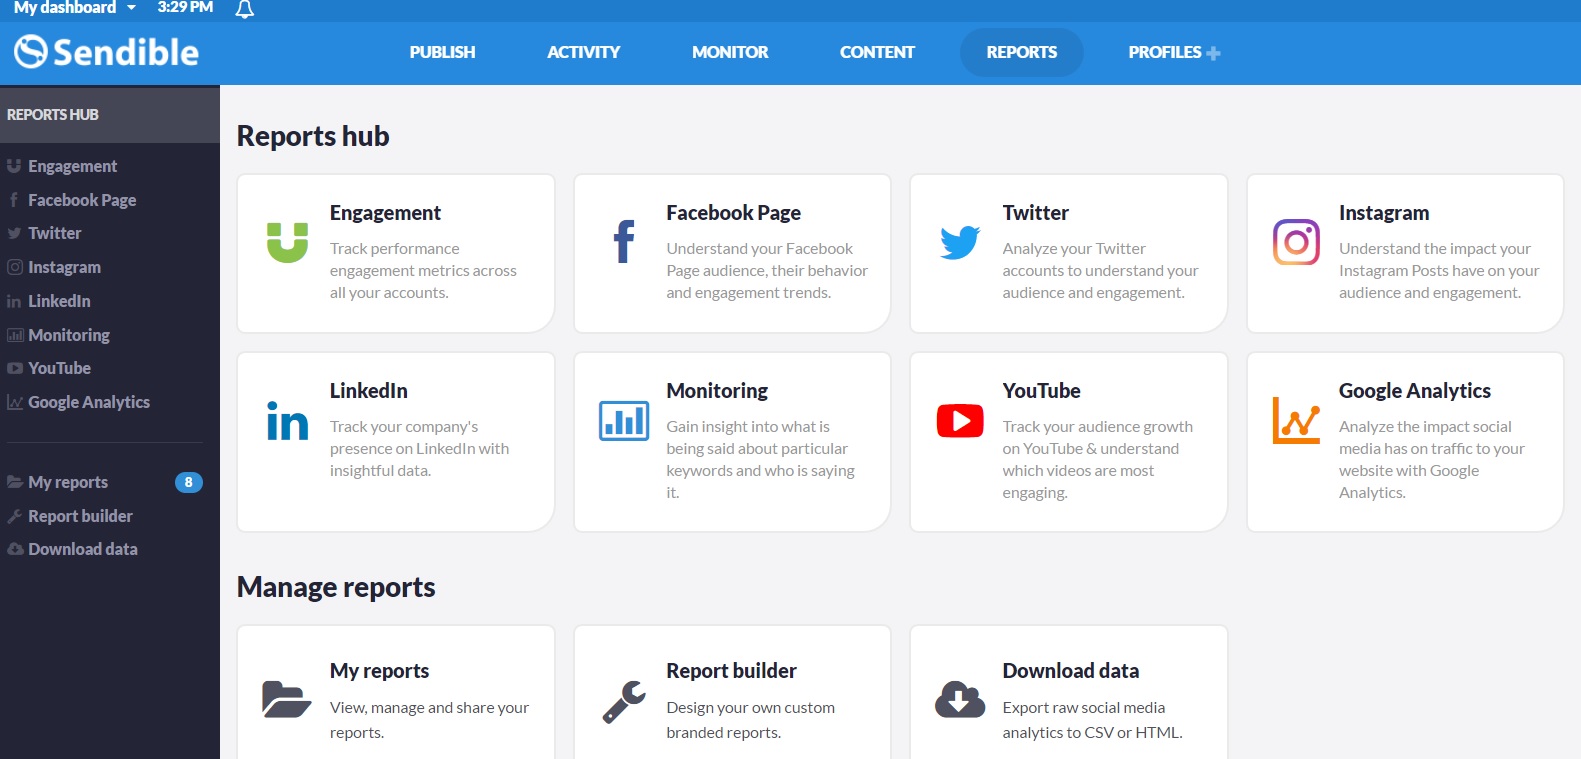
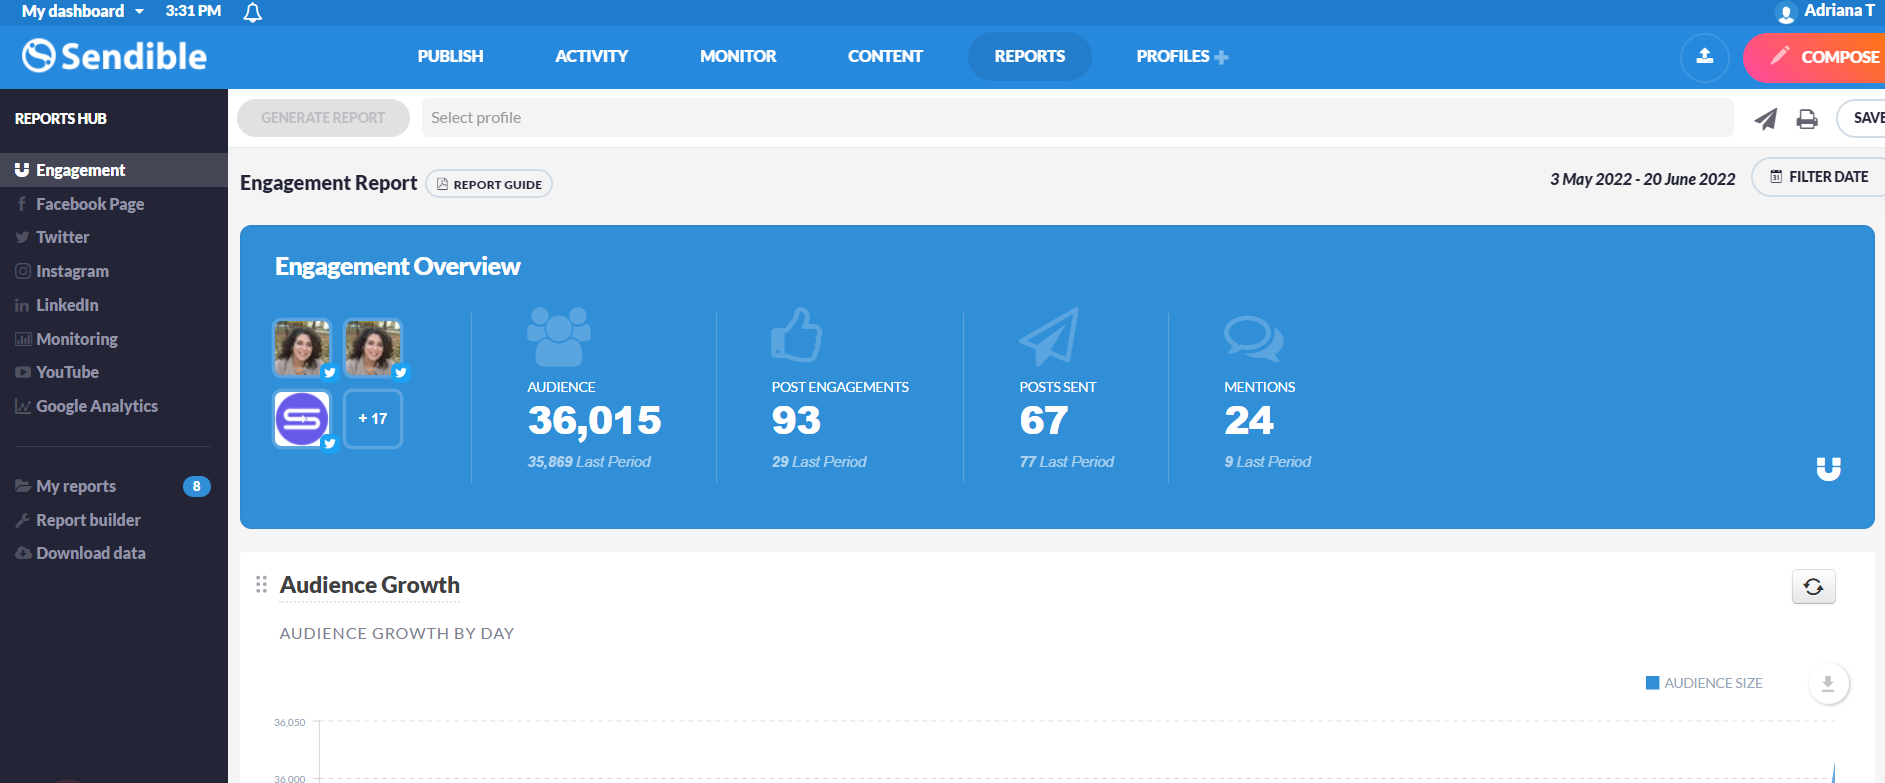
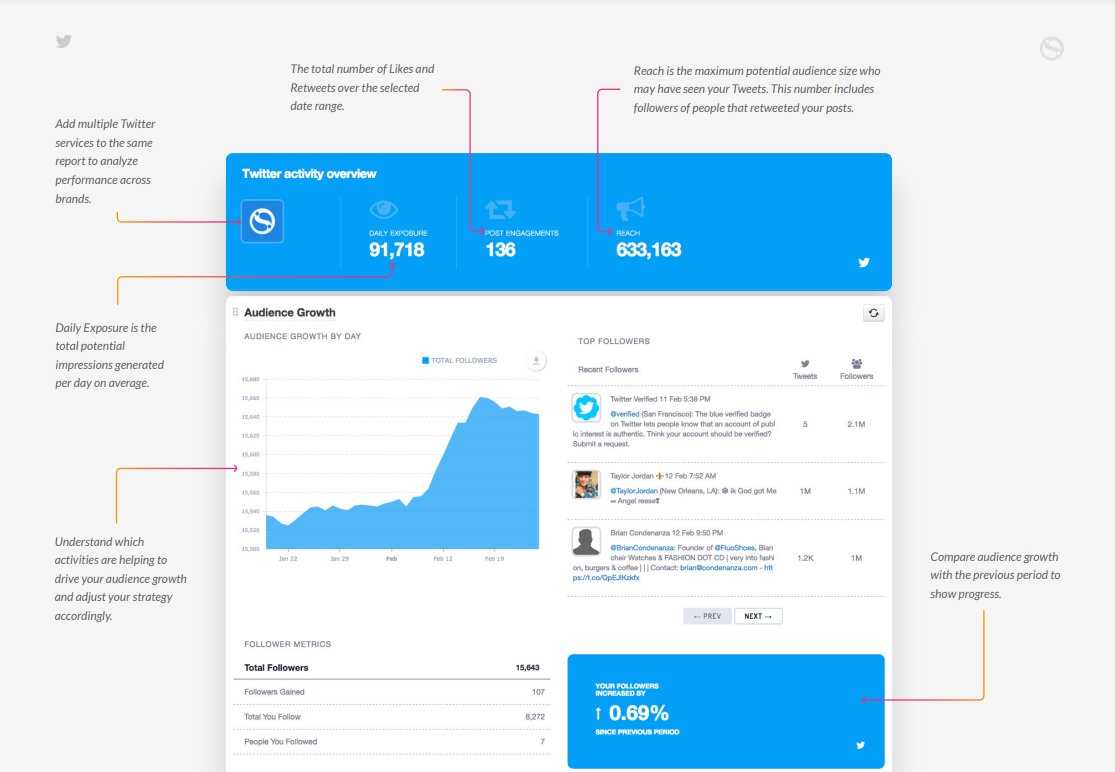
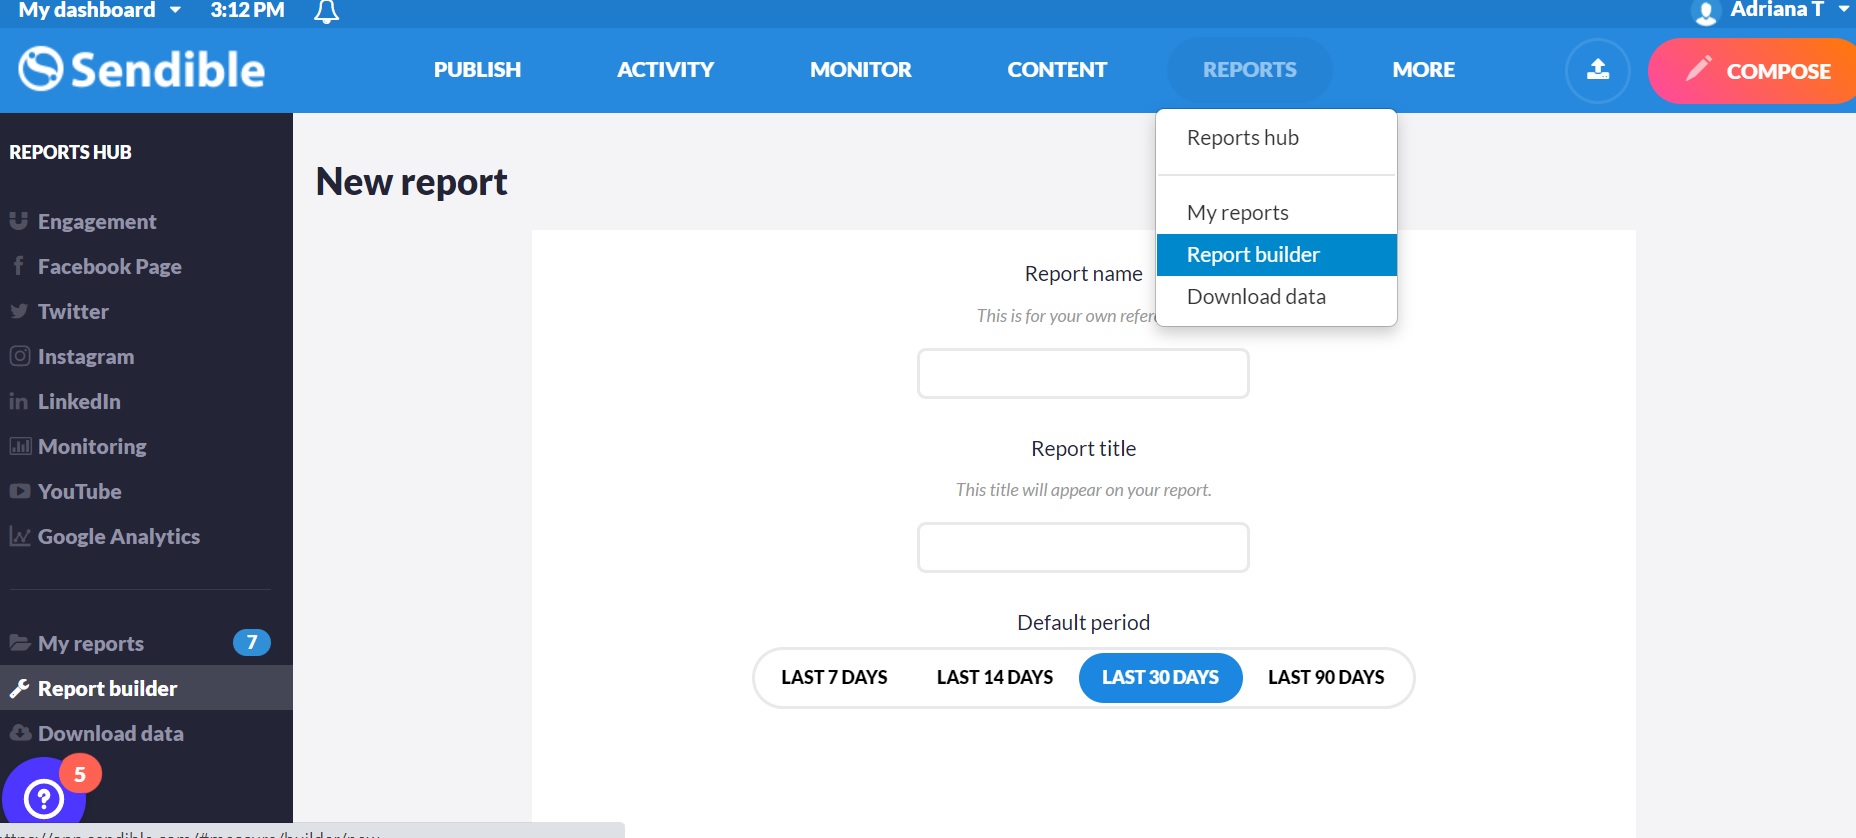
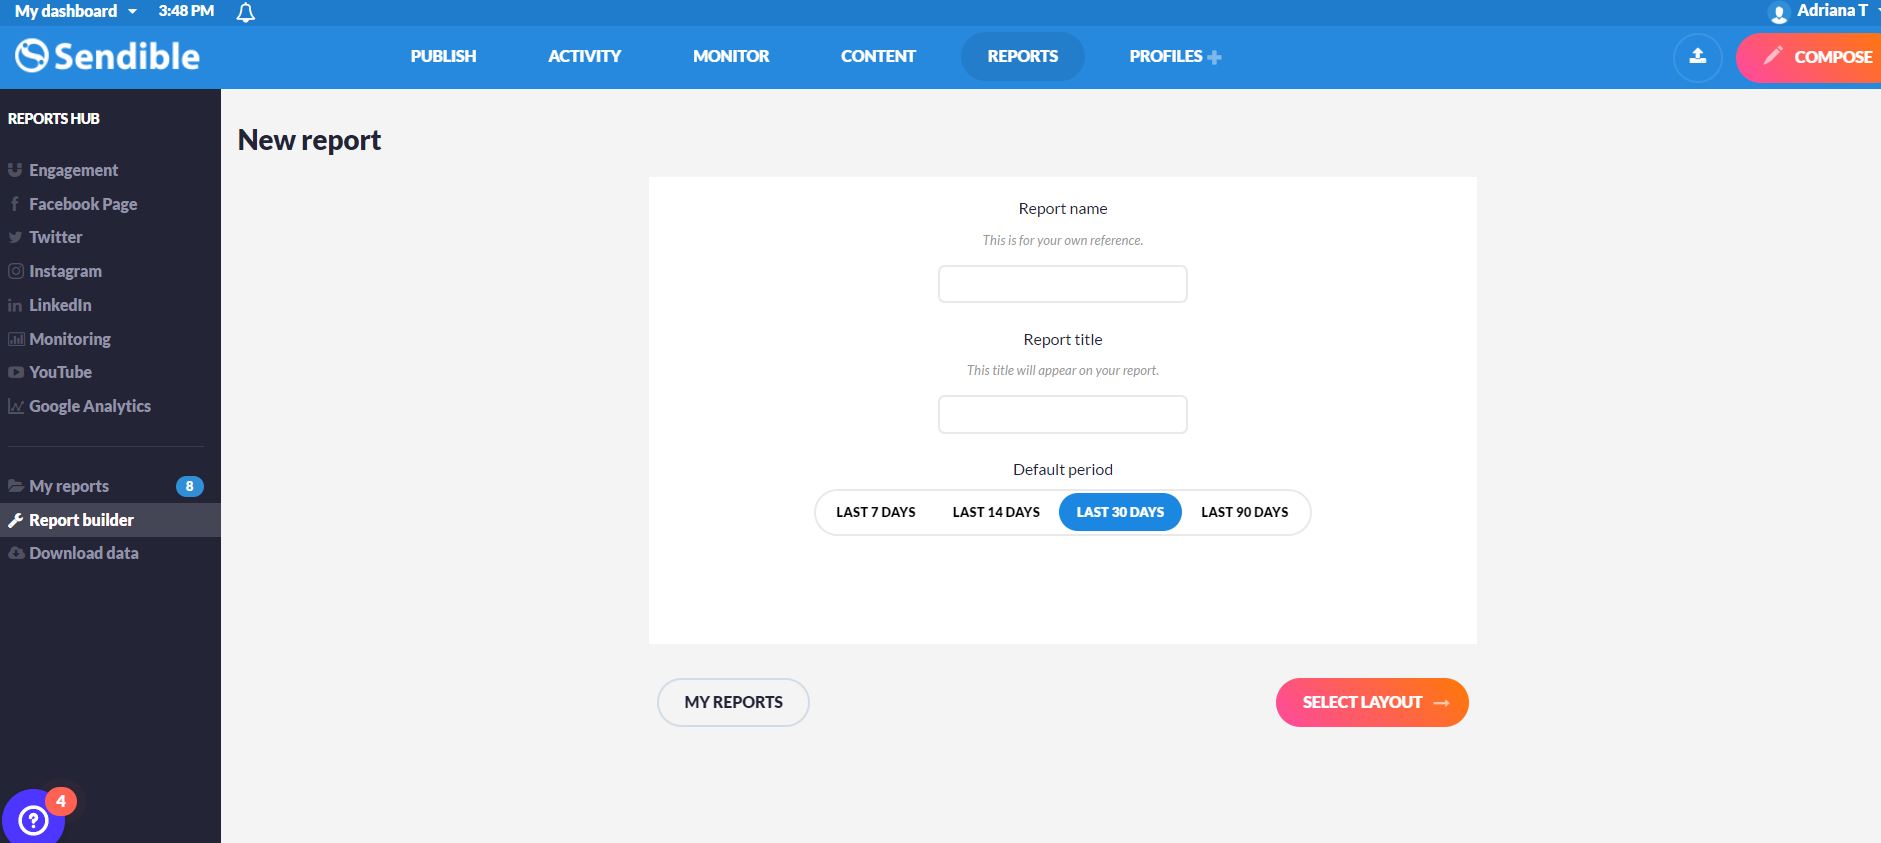
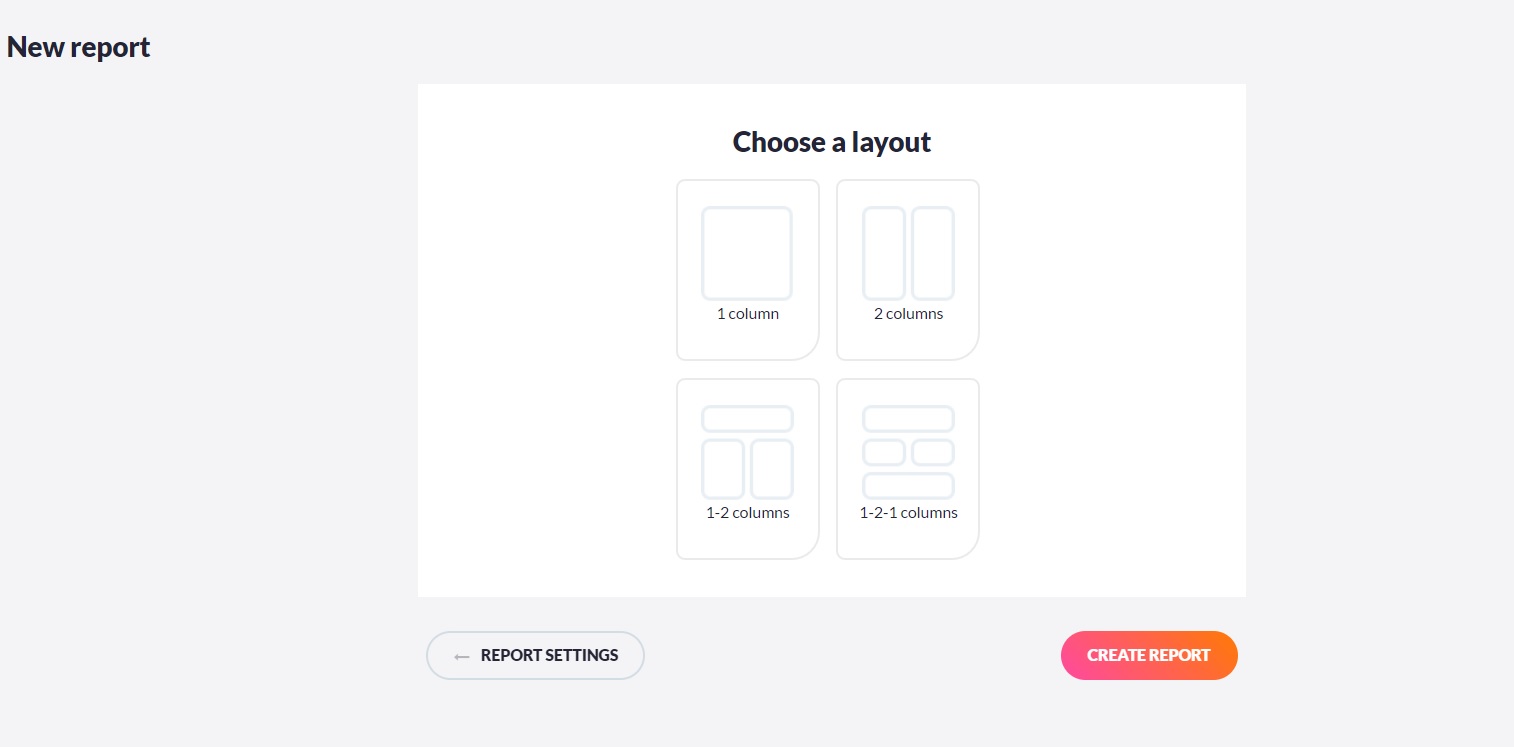
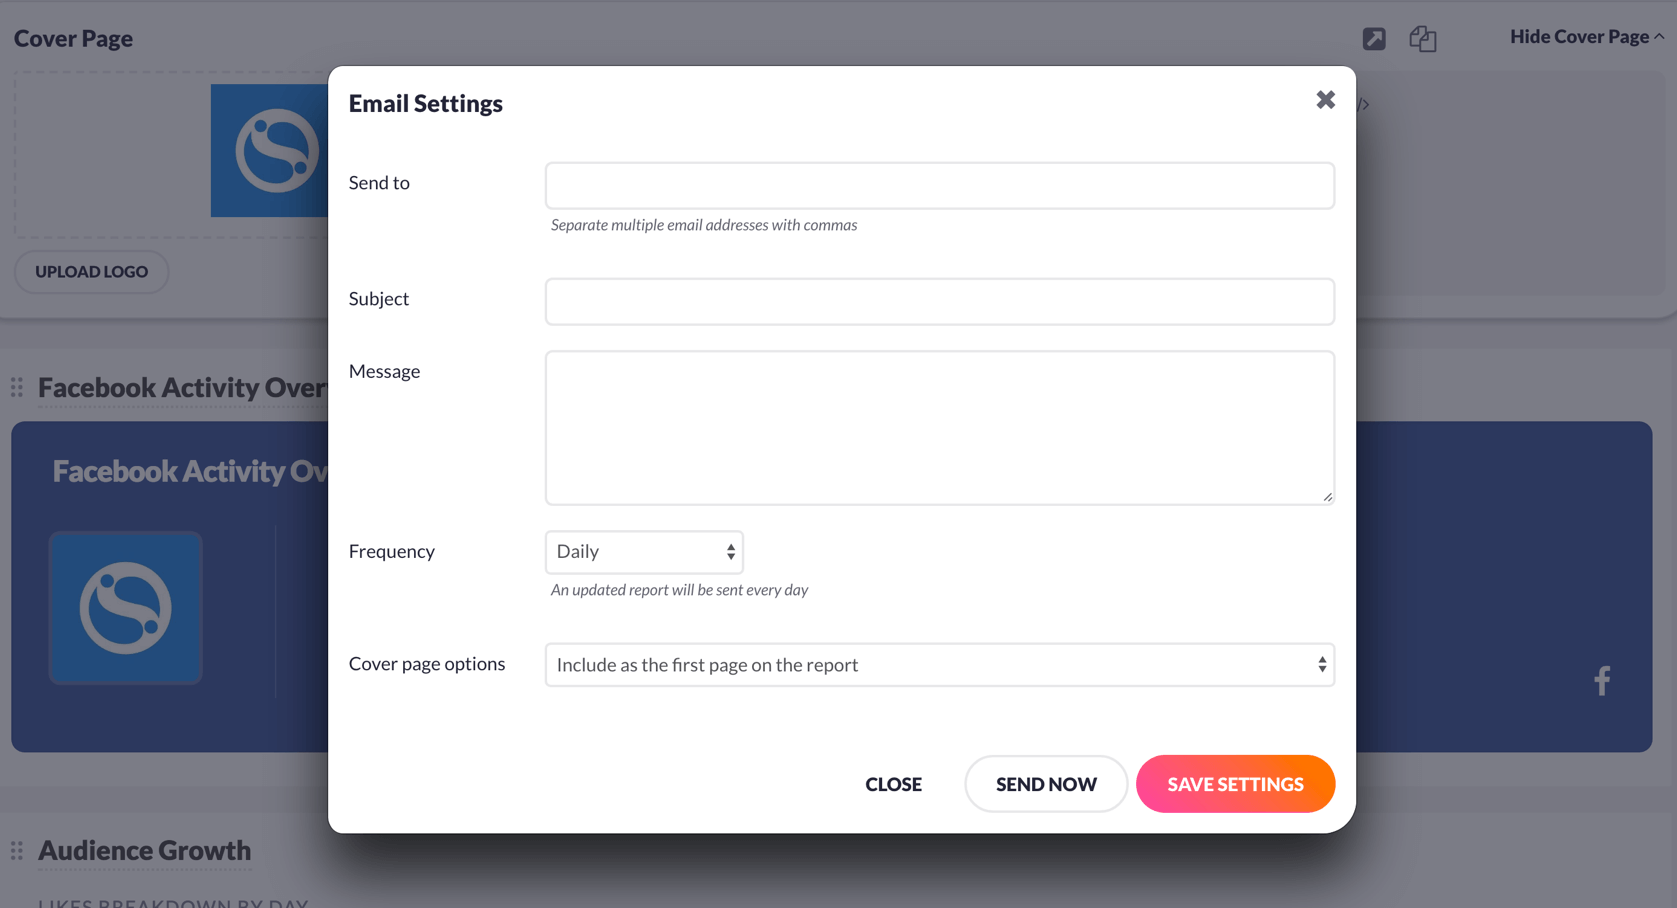
As I mentioned at the beginning of the article, we’ve got some history with this brand. [I even own a Sendible hoodie — super comfy, by the way!] But when I knew next to nothing about the brand and I was far from loving the brand, I made the choice exclusively on the features they offered. Back then, we had a few clients who were interested in Pinterest account management. Sendible was the only tool to offer Pinterest integration. So the choice was pretty easy. However, even after we stopped working with that client and we didn’t need Pinterest integration, we never switched to another tool. Here’s why: Even though my team and I have used a lot of other social media management solutions, we always kept Sendible as our in-house solution and for clients who didn’t have their own. My team and I have also used Buffer (who hasn’t), Hootsuite, SEMrush, Loomly, Agorapulse, Sprout Social, and a few other solutions that are dedicated to a single platform (most of them for Instagram). We’ve used them either as a trial or, more frequently because our clients already had subscriptions to them. Still, we’ve always gone back to our first love, Sendible. We’re still not planning to make any change because: Seriously! Every new social media expert we’ve hired got the hang of it almost instantly. We added clients to approve the posts we created for them and there was no learning curve. Just look at how intuitive their smart composer is: Typically, when I hear the word “smart” next to a SaaS feature, I know it’s going to be a hassle. Not the case here. You’ve got everything you need in a single window and you don’t have to jump through hoops to add more than one profile. Plus, you can easily customize the message for each social media platform. Want to write more in a LinkedIn post than in a tweet? Doable from the same screen in seconds! We love that we can pull various metrics in reports — oftentimes, even more metrics than you would find on the platform itself (especially on LinkedIn). For agencies, Sendible is perfect because you can customize each report in the report builder. Starting with the screen above, you can choose your timeframe and a custom title for each report. Next, choose a layout. These are pretty straightforward. But what’s really handy for agencies is the next step, modules: You can choose exactly what your report will show. For us, it’s super important not to drown our clients in metrics, but to show them precisely the metrics they are interested in. Since each client is different and has different goals for their social media strategy, no two reports are identical. Better yet, you can also monitor the activity of everyone involved in the management of an account. If you’re a freelancer that’s paid on volume, for instance, you’ll love the report builder that shows results AND the work you put in to get those results. Depending on what you publish and where you may or may not want to send the exact same message across all your profiles. Sometimes, small tweaks are absolutely necessary. For instance, when you want to publish a longer message on LinkedIn, Facebook, and Instagram, but you need to stay within the 280-character limit on Twitter. See the exclamation mark near the Twitter logo? This is the signal that I need to tweak my tweet. I can simply click on it and cut down on some words. After the change is made, Sendible will automatically create two versions of the same post that will be published at the exact same time. Sendible was one of the first platforms to allow you to publish every new format released by the social media networks, from stories to reels or carousels. Since our job in a social media agency requires us to stay on top of every new release, it’s very handy to have them on your SMM platform. It helps us stay current and it makes our lives much, much easier when we have to post new formats. Sendible pricing has changed a lot since 2015 when we became their subscribers — this is the case for every solution or platform in every industry, not just Sendible. But becoming a customer early on, when a SaaS solution is still in its infancy has its perks. We pay 35% of what we’d normally pay for the plan we need and have more profiles and perks. If we wanted to switch to another platform, we’ll have to pay three times and lose some of the features we love in Sendible. Your subscription may be more expensive if you’re just beginning with Sendible. But remember that inflation isn’t going away — so you’ll be able to brag about your great deal soon! If you don’t remember logging in and out of countless profiles to check what’s new and whether you have any messages or comments to reply to, congratulations! You’re either extremely young or you’ve started managing multiple accounts when social media management platforms were already a mainstream thing. I do remember what it feels like and it’s definitely not one of my fondest memories. When I first subscribed to Sendible I honestly had no idea they had this cool feature. As soon as I discovered it, my team’s life got SO much easier — dozens of hours saved every month easier. What is Priority Inbox, you ask? It’s a combined dashboard of ALL your social media profiles. It’s essentially an alerts view. Every time you receive a message or a comment on any of your profiles, it will appear there. Not only that, but you can also answer, share/retweet/repost directly from Sendible. This is the feature that saves a ton of time since you don’t need to log in to every profile every time you get an alert. Here’s what you can see in your Priority Inbox: And it gets better. Sendible also tells you if the message/comment is a negative, a positive, or a neutral one. This is what a positive comment looks like: Here’s what the Help section on the Sendible website tells us about how this works: “Grey stands for neutral, green for positive, and red for negative sentiments. “Sentiment” is judged based on the ratio of “good” words to “bad” words in the message. If there are more “good” words then the message is deemed as positive sentiment and vice versa.” Pretty cool, right? Suppose any of the features above caught your eye and you’re thinking about switching from your current social media management platform to Sendible. In that case, I bet you there’s one big question on your mind: How can I set up my social media accounts in Sendible? In other words: will it take me ages to do it? Do I have to block out an entire day for it? Take it from someone who adds profiles on a monthly basis: not at all! Adding new social media profiles to your Sendible dashboard is super easy. If you want to add fewer than 20 profiles, you’ll be done in less than an hour. Here’s how to get started with adding profiles: [Pro Tip: Make sure you have all the credentials you need to connect the accounts before getting started] The process for LinkedIn profiles or Instagram is very similar to this one. There is, however, a significant difference when you want to add a Facebook Business page. The good news is that it’s EVEN easier. That’s it! You can now start posting to your Facebook page and manage interactions via Priority Inbox! Watch a video version of this process here: https://www.youtube.com/watch?v=WIXkNTxDOH4 Ready to connect your social media profiles to Sendible? Start here: To schedule a post in Sendible, click on the “Compose” button that’s always visible, no matter what menu you’re in. You’ll find it in the top right-hand corner. A new window will open up and you’ll get a few options: Of course, you start by selecting your profiles. You can select one, two, or all of your connected profiles — no limits here. Then start typing your post. You can add emojis, images, videos, the works. Just make sure that every graphic element you choose is supported by the social network you want to publish your message on. If it’s not, you’ll get an error message and your post won’t be published. Move on to choosing the date and time for your post and that’s it! Now for a few tricks we love when scheduling posts in Sendible: You may have noticed a tiny thumbtack next to the profiles section. If not, here it is: If you toggle it, Sendible will automatically remember the profiles that are currently selected. We use this feature when we schedule a lot of posts for a single profile or a group of profiles for our agency or for a client. It may not look like much, but it helps save quite a lot of time. You don’t have to keep adding your profiles every time you compose a new message. It’s a time saver for us, as an agency, because we don’t have to sort through dozens of profiles. If you only have one set of profiles, you can simply keep the toggle on and your “Compose a message” window will always pre-select them. There’s a good time and a bad time for everything. As I’m sure you know, social media posting makes no exception. Finding the right time to publish a post (aka the time when it’s more likely to get a decent organic reach and engagement) depends on a lot of factors. You may already know when your audience is online, in which case you can manually select the time. If you don’t or if you want to test several options (which I highly recommend you to do even if you already get decent engagement), you can let Sendible decide for you. See the yellow star next to the clock? Toggle it and Sendible will use AI to find the best time for publishing each post. Here’s how we use it: when we start working with a new client, we choose the time manually for the first few posts. We choose various times of the day on purpose, to test things out. We’ve found that after a week or two of testing, Sendible has learned enough about the performance of the posts you schedule, so that it can choose a publishing time on its own — you will see a difference in engagement. Most of the articles we publish on our blogs are evergreen. Evergreen content doesn’t have an expiration date, so it can be published as many times as you want. Better yet, you should publish more than once. Organic reach is abysmal on all social media platforms, so if you publish a piece of content only once, it’s likely that less than 1% of your followers will see it. Plus, not all of them may have the time to click on it when they see it. We love this Sendible feature because it allows us to schedule the same post more than once without having to go back and do it manually. It’s the kind of set-and-forget feature that makes a world of difference for evergreen content creators. Here’s how easy it is to use it. Start by checking the “Repeat” option in your compose box: As soon as you’ve ticked the box, you can choose among a few options: We usually choose the “Weekly” option for newer posts or the “Monthly” one for posts that have already done the rounds. Again, I suggest testing a few options to learn what works best for you. This feature is one of my personal favorites. But be careful: it’s very easy to abuse it. If you do, your social media profiles will start looking like bot-managed accounts and I’m sure you don’t want that! We’ve finally arrived at my favorite section: reporting. I’m a data-driven marketer, so for every SaaS solution I test (for social media or for something else), the reporting section is one of my main focuses. What I absolutely love about Sendible reporting is the flexibility. You can create reports on anything, anytime. You can go as in-depth as you want, highlight ALL the metrics, or just a few of them. For a social media agency, this is crucial. We’ve got a lot of clients who are interested in one or two metrics alone (channel growth and engagement most often). But we’ve also got clients who want to know everything that happened on their social media accounts. Lastly, my favorite bunch: people who have very clear goals for their social media channels so they are interested in different metrics (more than two, but definitely not all of them) for each platform. This is the approach we use for our own channels. All in all, it helps to have this kind of flexibility, especially if you work with multiple clients or with more than one brand. Without further ado, let’s dig deeper into Sendible reporting. You’ll find everything you need in the Reports section, which has two main sections. From there, you can choose the Reports Hub if you’re looking for a quick, at-a-glance overview of your social media performance. For example, if you click on the first option, Engagement, you’ll get an overview of how your accounts (all the accounts connected to Sendible) did during a specific timeframe — you can always edit this timeframe. You can go through the options in this menu one by one and find the report you need. As you can see in the screenshot above, you can get at-a-glance reports for Facebook, Twitter, Instagram, and more. For each of them, you can add more Facebook pages/Instagram profiles on a single report (although I suspect this is something that you will need rarely — it’s always better to measure each page on its own) or you can choose the page or profile you want the report for. Once you have selected the accounts you want, you can click on Generate Report. As you may have guessed, this button generates a report on all the accounts you selected for the selected timeframe. You can, of course, save, email, or print your report. Not sure what to make of that report? Luckily, the smart people at Sendible have thought about that too. Each report comes with a platform-specific Cheat Sheet that can help you understand each of the metrics. Pro tip: these cheat sheets will come in handy if you want to send reports to someone who’s not a social media specialist, like a manager or a client. You can help them understand what’s worth measuring and what’s not, depending on your business goals. If you need a different kind of reporting, you’ll find that in: Confession time: I spend a lot of time here. The Report Builder is the place where you can create any report you want, for any account or combination of accounts, with any metrics you want. You can get to it very easily: As soon as you click on Report Builder, you’ll be taken to a new menu, where you can customize pretty much everything. You will start with naming your report and choosing a period for it: I recommend you choose a name that you’ll remember or that describes exactly what that report is about. For example: [MyAccount Name] Facebook Report July 2022. You will want to know what it is without opening it in the future. Next, choose your preferred Layout: This is strictly a matter of preference, it won’t influence what’s inside. You can tinker with it for a little while to see what’s easier to follow for you. Now for the good part: select the modules you want to add to your report: You’ve got 250 modules to choose from. You can only add 30 of them per report. But you can also create more reports (there is a report limit to all accounts, depending on your pricing plan). You can always download your reports and delete older ones from your Sendible account when you need to build something new. This may sound somewhat limiting, but, in my experience, you don’t need more than 30 modules. In fact, you should be using fewer. More than 30 metrics will make your report look unfocused and you’ll invariably add vanity or irrelevant social media metrics. That’s it! Once you’ve chosen your modules, you are ready to generate your report. As before, you can download it, email it to your client, or print it. One of the coolest features of Sendible reporting is that you can set it to send regular reports to your clients or managers. Choose the modules you need, then set the frequency you want to send the report with: Here’s how we use this cool feature: we choose the monthly option (anything more frequent is rarely relevant and if you need a more frequent report you can always create one) and we add our own email addresses to the “Send to” field. Why? Because when you automate things, you often tend to forget about them. While we check client metrics at least weekly, it helps to have a monthly reminder to take a look at the big picture as well. Ready to wow your clients or managers with state-of-the-art social media reports? Start here: As you may know, posting your own content on social media ad nauseam is not always the best way to improve your engagement. Evergreen posts are great, but it also helps to sprinkle in some fresh or news-like content. But you may not always have time to write your own news-like content or even to scour the internet for what’s hot and trending today. This is where your friends at Sendible can help (again!). The Content Suggestions or content curation menu does exactly what the name implies: it suggests content from around the big web for you to publish on your profiles. This is the “generic” view to get you started. As soon as you pick some topics and start posting content from them, you will get personalized recommendations for each account you manage. Even to begin with, the recommendations are not completely random. They are articles and news pieces that are already performing well or trending on social media. This is what the iOS section looks like: This is another feature with game-changer potential. As you keep using it, Sendible “learns” what works and what doesn’t for your own accounts and keeps refining the recommendations. And — you’re going to love this!— you can find more than media articles. Check the “Influencers” button at the top and you’ll get a list of influencers that post content on the topics you’ve chosen: So yes, you can even find influencers on Sendible — neatly grouped by topic and field of activity. How cool is that? We use this feature roughly one or two times per week for most of the accounts connected to our Sendible dashboard. To us, it’s also a source of inspiration in creating our own content — for clients or for ourselves. After seven years of using Sendible, we’re still very adamant that this is the best social media management solution out there. But this doesn’t mean it can’t get better. Here’s a quick view of Sendible’s pros and cons (in our view): Since scheduling and posting work (almost) flawlessly on pretty much any platform, I’ll just outline the things you can’t find anywhere else — at least not all of these together: Of course, some things could be better. Want to test Sendible for yourself? Start here completely free! At the moment of writing this, Sendible pricing starts at $29. Their most affordable plan is great if you only need to manage a single company’s profiles or your own. Here are the other pricing tiers: Sendible pricing is based on the number of profiles you want to connect, which I think is pretty fair. The more profiles you have, the clearer it becomes that you are a social media professional who needs access to state-of-the-art tools. Want to save some money on your Sendible subscription? If you opt for a yearly plan, you will get 15% off. Click here for the current Sendible pricing! Sendible and Buffer are perhaps the best-known social media platforms. But how do they stack against each other? Which is better between Buffer and Sendible? As always, it depends on whom you ask. Buffer has a free plan — one of the few social media management platforms to still offer it. It only allows you to manage up to three profiles, but it’s still a great way to get started. The rest of the Buffer plans are also based on the number of accounts you want to connect. However, you’ll see that, even if at first glance Buffer seems to have a more affordable pricing structure, things add up quickly if you have to manage more accounts. More importantly, Buffer is mostly a social media scheduling tool, while Sendible is a complex social media management solution that offers analytics, reporting, content curation, and more. Between Sendible and Buffer, choose Sendible if you do social media professionally and you need to track business-relevant metrics. Choose Buffer if you’re just getting started with social media and need a simple solution to dip your toe into the world of social media management. Want to choose Sendible as we did? Start here! Hootsuite is a closer competitor to Sendible. Choosing between Sendible and Hootsuite is not exactly straightforward, so I’d recommend doing a free trial of both. Both Sendible and Hootsuite offer in-depth analytics, although Sendible’s are a bit more detailed and a lot easier to personalize. However, it’s worth noting that, unlike Buffer, Hootsuite is a complete social media management platform. You will also get a social stream on Hootsuite, but Sendible’s Priority Inbox is far easier to manage since you have everything in one place. The one thing that Hootsuite has and Sendible doesn’t is a built-in feature for social media contests and sweepstakes. If you’re big on those, Hootsuite may be worth a second look. But you can find other third-party tools to help you with them if Hootsuite is not your jam. As far as pricing goes, Hootsuite starts higher than Sendible, at $49, but for 10 social media profiles. Other than this, the pricing tiers are pretty similar on both platforms. One last thing: Hootsuite has a 30-day free trial, while Sendible only offers 14. All in all, I’m sticking with Sendible because of the in-depth reporting features and the ease of scheduling messages and automating repeated posts. Want to see for yourself while we’re not letting go of Sendible after 7+ years? Start your free trial! Sendible supports Facebook, Facebook Ads, Twitter, Instagram, LinkedIn, WordPress and WordPress.com, Canva, Google Analytics, Dropbox, Google Drive, and others. To start using Sendible, create a free account. You will then need to connect your social media profiles. Once you’re all set, you can start using Sendible: scheduling posts, creating reports, finding new content suggestions and influencers, and more. You can schedule 100+ posts per day on Sendible, depending on the plan you’re on. Here’s the full breakdown: Yes, Sendible has an app and it’s available the App Store and Google Play. With the Sendible app, you can publish message, respond to your audience via the Priority Inbox, keep track of metrics, and more. You will find almost all the desktop features in the Sendible app. Yes, Sendible is VERY easy to use, even if you’re not at all familiar with social media management solutions. You have a lot of tutorials you can watch or read and a great support department that’s always ready to jump in. My team and I have been using Sendible for a VERY long time. We’ve used pretty much every feature it has to offer. As a social media agency, our Sendible review is based on the opinion of several team members, as well as clients. It’s a collective Sendible review, if you will. However, there’s a reason why we never looked back after choosing Sendible. In fact, there are several of them. Try it for yourself, it’s 100% FREE, so what have you got to lose? Disclosure: This post contains affiliate links. This means we may make a small commission if you make a purchase, at no additional cost to you. Why Did We Choose Sendible Back in 2015?
Why Do We Keep Using Sendible [And What Other Social Media Management Tools We’ve Used]?
Sendible Is Insanely Easy to Use
2. Reporting Is Super In-Depth and Highly Customizable


3. Easy to Make Tweaks When Composing Messages
4. New Changes in Social Media Platforms Are Quickly Adopted in Sendible
5. We’re Grandfathered by Sendible!
6. Priority Inbox Allows You to Stay on Top of Community Engagement Effortlessly
Discover your own favorite things about Sendible. Try it for free, no credit card needed!
How Do You Set up Your Social Media Accounts In Sendible?

How Do You Schedule Posts in Sendible?
Pin Your Most Frequently Used Profiles
2. Choose the Right Time to Publish a Post
3. Schedule Recurring Messages to Make the Most out of Your Evergreen Content
Try Sendible for free!
Sendible Reporting Highlights
The Reports Hub – At-A-Glance Social Media Reports Made Easy
The Report Builder — Social Media Reports that Look and Feel Exactly How You Need Them to

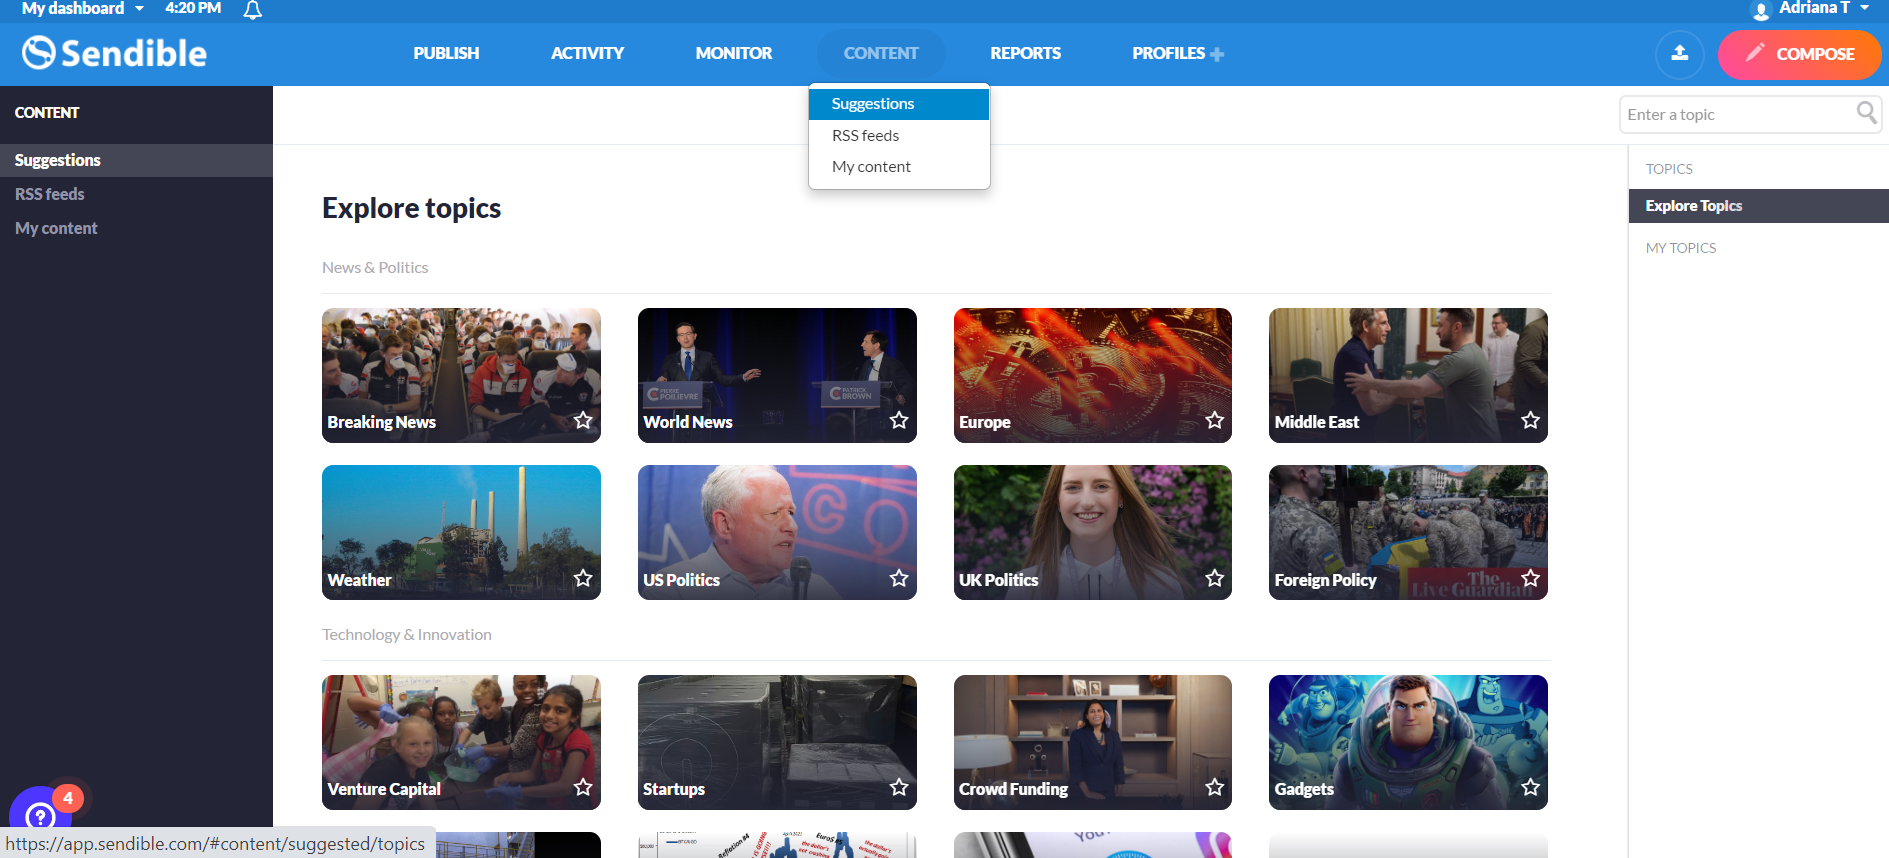
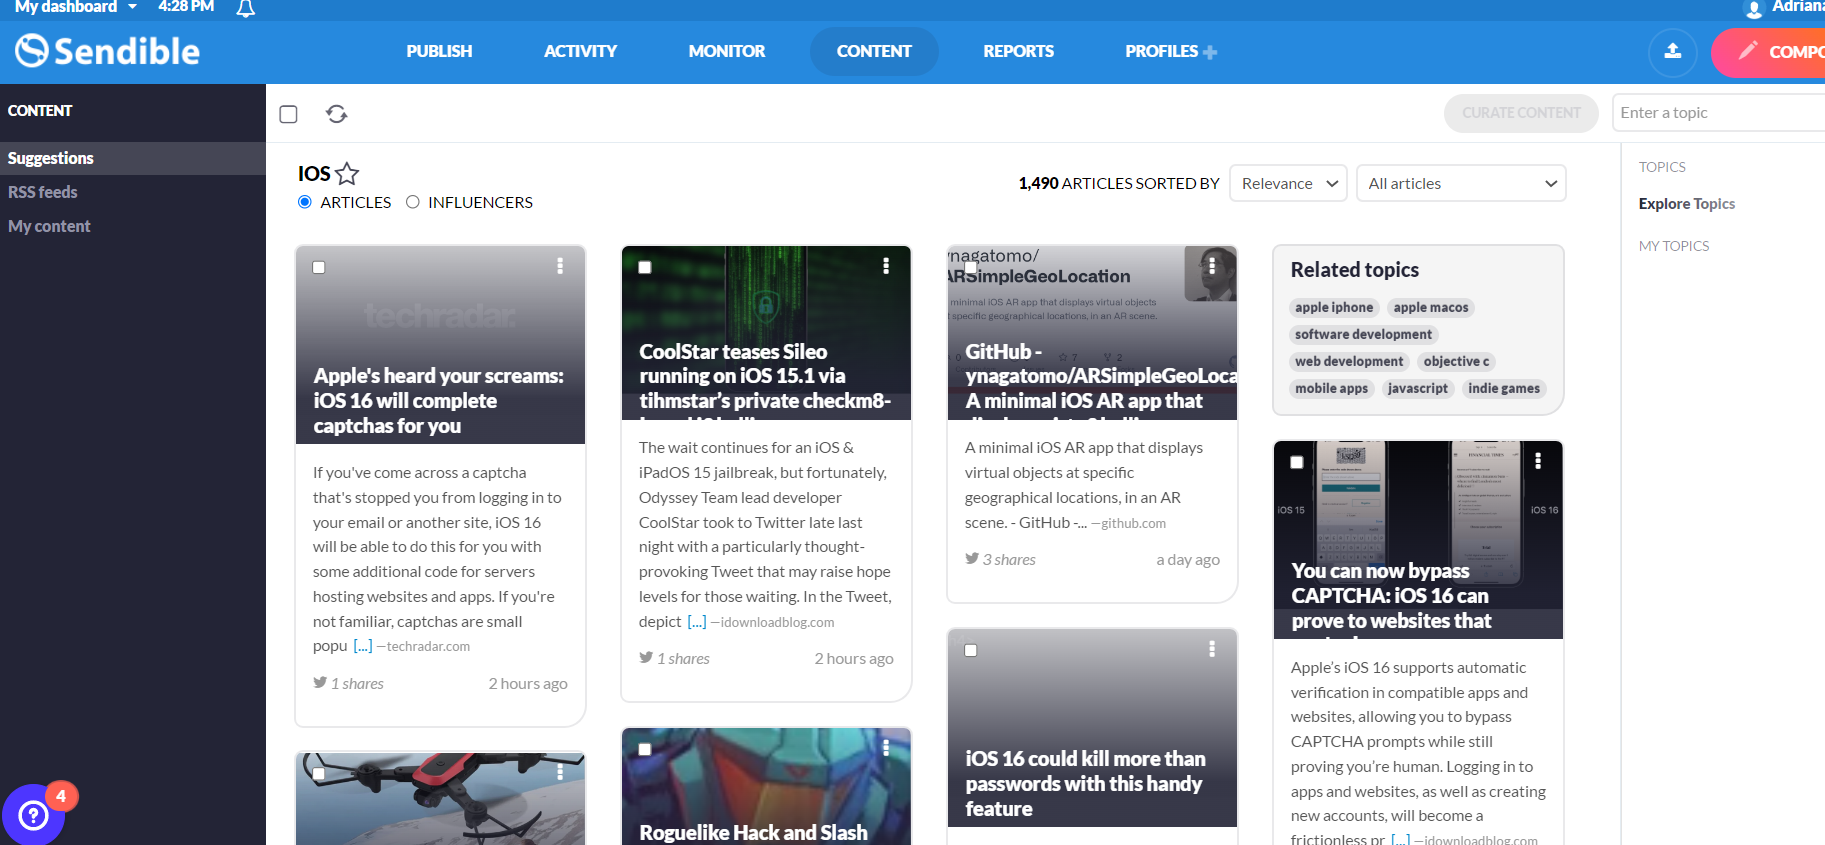
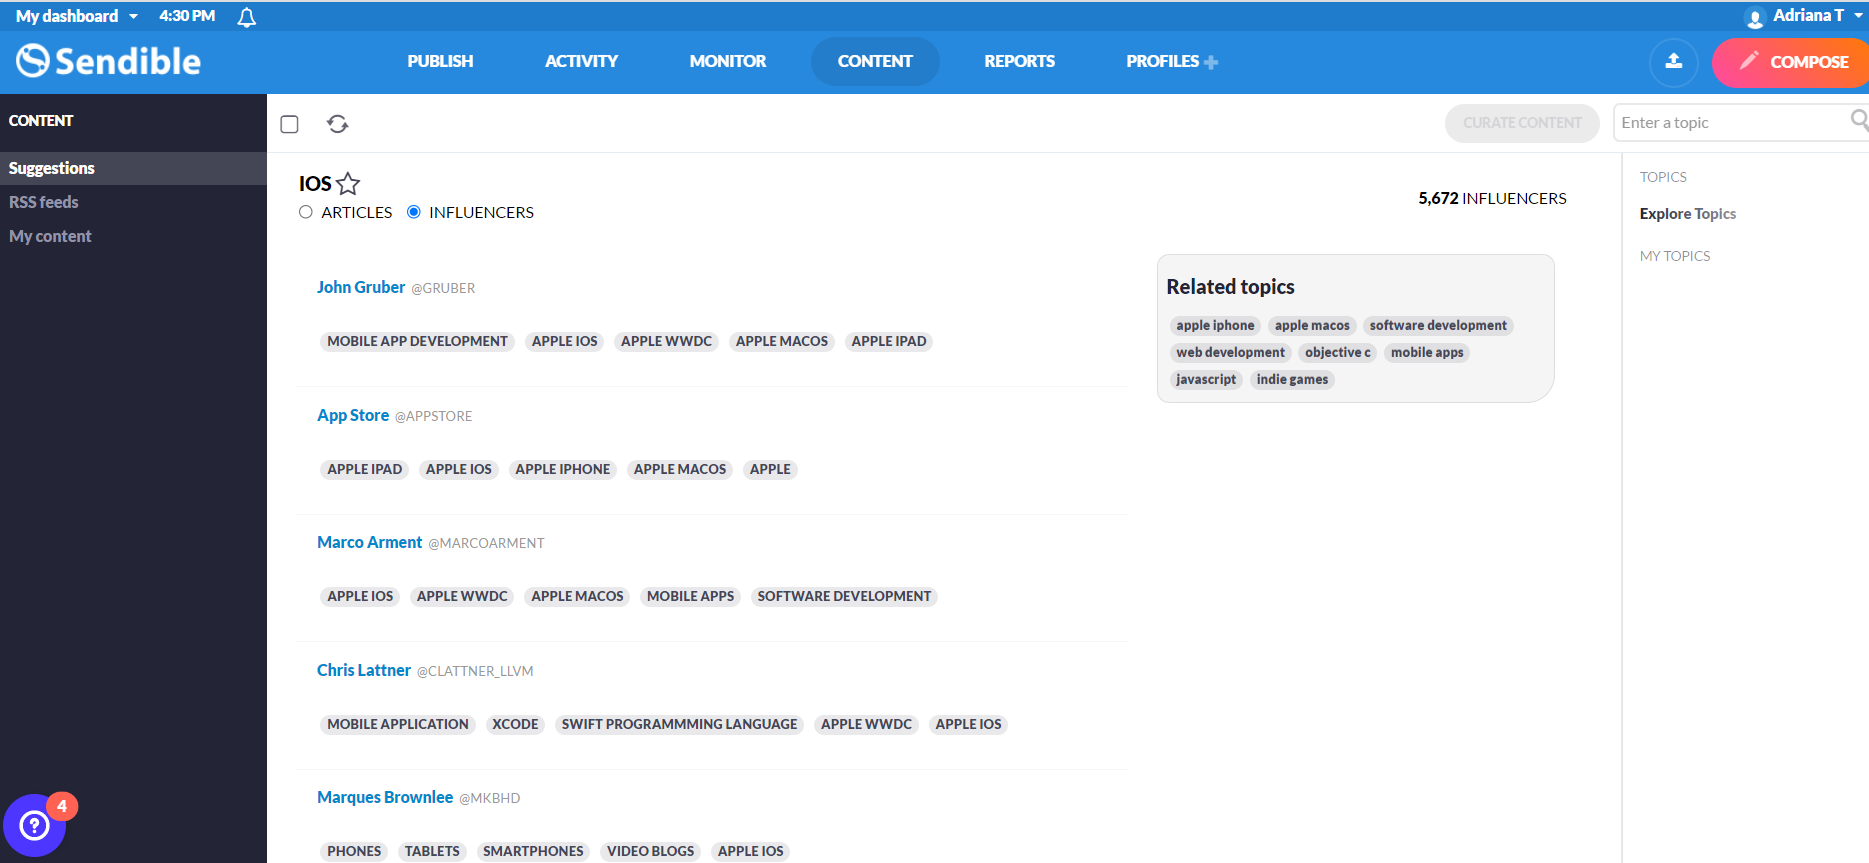
Content Curation on Sendible: An Easy Way to Get More Engagement
Don’t take my word for it! Try the Content Suggestion feature on your own — it’s 100% free! Start here:
Try Sendible for free!
Sendible Pros and Cons
Sendible Pros (What We Love About This Solution)
Sendible Cons (What We’d Like to See Improved)
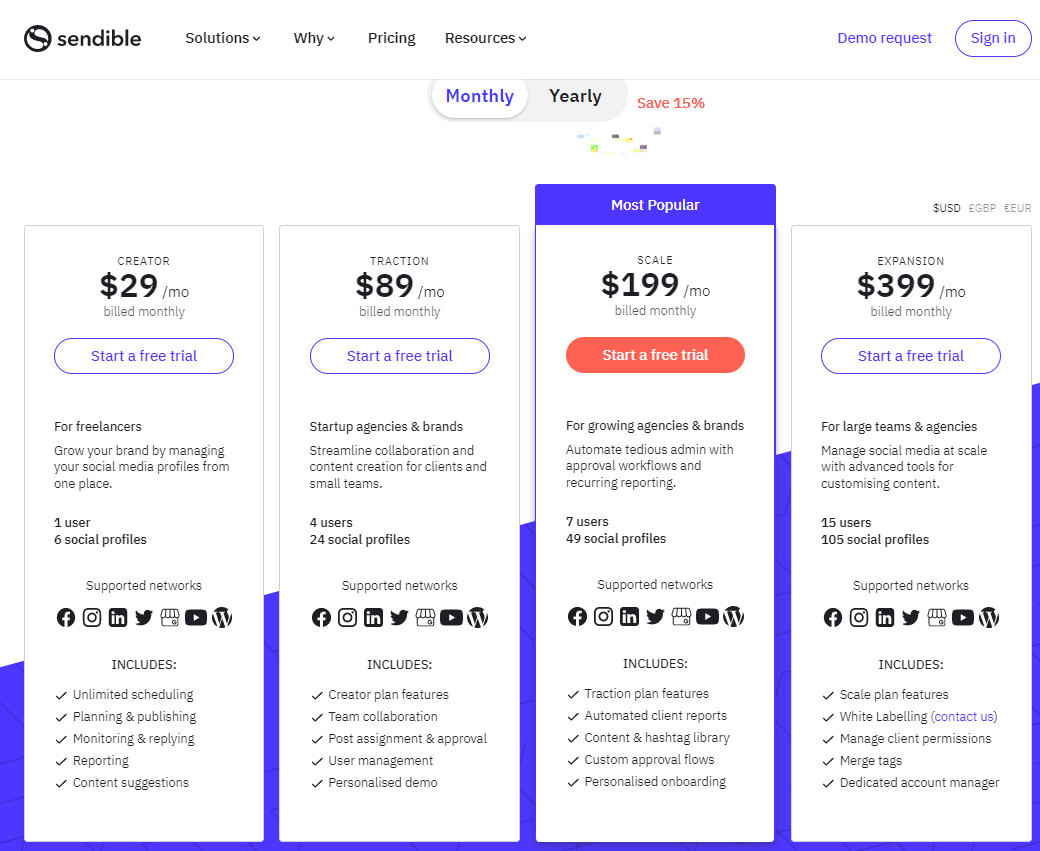
Sendible Review: Pricing Information
Sendible versus Buffer
Sendible versus Hootsuite
FAQs
What social media platforms does Sendible support?
How do you use Sendible?
How Many Posts Can You Schedule on Sendible?
Does Sendible Have an App?
Is Sendible Easy to Use?
Sendible Review: Wrapping Things Up